Introduction#
I’ve been running the arr* stack for years now, and what I love most is the easy setup, massive community support, and endless media options. My homelab journey started back in college, where I experimented with different platforms — TrueNAS apps, Unraid containers, various automation tools, and even a full K8s GitOps setup with Flux.
For the past year, though, I’ve settled on Docker containers, and honestly, it’s been the easiest stack to manage yet.
Don’t get me wrong, I also run a 4-node Kubernetes GitOps cluster, which is awesome but definitely overkill for a single user. I distributed each K8s node across different Proxmox servers, which means every time I want to spin up the stack, I need to boot up all my machines. Not exactly convenient.
That’s when it hit me: for solo homelabbers, Docker is the sweet spot. It’s simple, fast, and I can tear everything down and rebuild in minutes if needed. So I figured it was time to share this setup with the community.
Security First#
Keeping things simple doesn’t mean cutting corners on security. In fact, one of the biggest mistakes I see in homelabs is accidentally pushing secrets to Git. It happens more often than you’d think, a single exposed API key in a commit history can spiral into a serious security issue.
That’s why I made secret management the foundation of my setup from day one. Using Doppler, I keep every API key, password, and credential completely separate from my codebase. No secrets in Git. Ever.
Here’s how it all works together.
The Stack#
My homelab runs on five core tools that handle everything from infrastructure to deployments:
Proxmox: Repeatable Infrastructure#
If there’s one thing I’ve learned running a homelab, it’s this: manually configuring VMs is a terrible use of your time. I used to SSH into each new machine, install packages, configure users, set up SSH keys… you get the idea. It’s tedious, error-prone, and honestly? Pretty boring.
Everything you see here — the Proxmox scripts, Ansible playbooks, Docker Compose files, GitHub Actions workflows — is open source and ready to use.
Grab the code: AkashRajvanshi/homelab-media-stack ⤴
Clone it, break it, make it your own. That’s what homelabs are for.
Creating the Base Template#
That’s why everything in my setup starts with VM templates. I have a simple bash script that creates a cloud-init template for Debian. Think of it as a “golden image” — a pristine, pre-configured starting point. When I need a new server, I just clone the template, adjust a few settings (IP address, disk size, etc.), and boom, a fresh VM ready to go in under a minute.
I use a shell script called debian13-template.sh to build the reusable base image. The script uses environment variables to keep everything clean and easy to tweak:
# Step 1: Create the Base Template

export VM_ID=8011
export VM_NAME="debian-13-cloudinit-template"
export STORAGE="local-lvm"
export MEMORY=1024
export CORES=1
export DISK_SIZE=32
export CLEARTEXT_PASSWORD='your-secure-password'
./debian13-template.sh

update VM 8011: -ipconfig0 ip=dhcp
generating cloud-init ISO
Converting to template...
  Renamed "vm-8011-disk-1" to "base-8011-disk-1" in volume group "pve"
  Logical volume pve/base-8011-disk-1 changed.
  WARNING: Combining activation change with other commands is not advised.
  Renamed "vm-8011-disk-0" to "base-8011-disk-0" in volume group "pve"
  Logical volume pve/base-8011-disk-0 changed.
  WARNING: Combining activation change with other commands is not advised.

Debian 13 template created successfully!
Template ID: 8011
Template Name: debian-13-cloudinit-template
Clone and Customize#
Now comes the magic part. With the template ready, spinning up a new VM is literally a single command.
I use another script called debian13-vm.sh that clones the template and customizes it on the fly — VM ID, hostname, IP address, CPU, RAM, disk size, everything. No manual clicking through the Proxmox UI. No forgetting to set the gateway. Just variables and automation.
Here’s how I create a new media server:
export TEMPLATE_ID=8011
export STORAGE=local-lvm
export MEMORY=8192
export CORES=4
export SECOND_DISK_SIZE=300G
export SECOND_DISK_STORAGE=local-lvm
./debian13-vm.sh 390 "hl-media-debian" 190

Creating VM from template...
Template ID: 8011
New VM ID: 390
VM Name: hl-media-debian
IP Address: 10.0.5.190/24
...
Cloning template 8011 to VM 390...
...
Adding additional storage to virtio0 (+45G)...
  Size of logical volume proxvg/vm-390-disk-1 changed from 32.00 GiB to 77.00 GiB.
  Logical volume proxvg/vm-390-disk-1 successfully resized.

Creating second disk (300G)...
  Logical volume "vm-390-disk-extra" created.
successfully created 'vstorage:vm-390-disk-extra'
update VM 390: -scsi1 vstorage:vm-390-disk-extra

VM creation completed successfully!
VM ID: 390
VM Name: hl-media-debian

You can start the VM with: qm start 390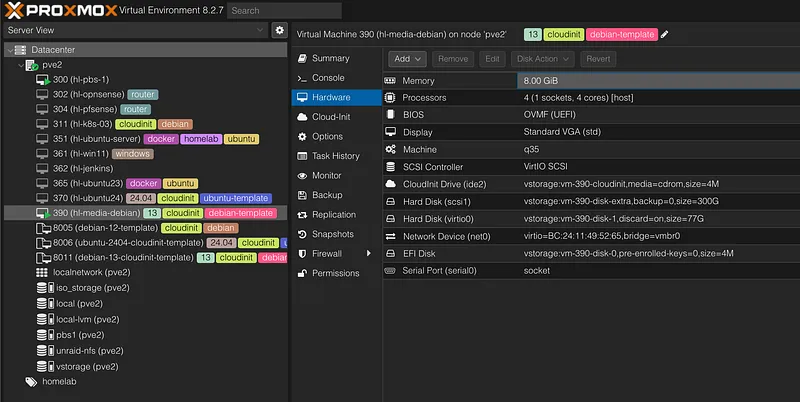
Ansible: The Automation Engine#
Alright, VM is up. Now what?
This is where Ansible takes over and does all the heavy lifting. No more SSH-ing into boxes to install packages, configure users, or set up Docker. Everything is automated through Infrastructure as Code.
My Ansible setup uses modular roles and playbooks, which means every server gets configured identically and predictably. No more “it works on my machine” moments.
Directory Structure#
Here’s how everything is organized:
ansible/
├── ansible.cfg               # Global Ansible configuration
├── requirements.yml          # Dependencies for community roles
├── inventory/
│   └── hosts.ini             # Server inventory and connection details
├── group_vars/
│   ├── all.yml               # Variables applied to all hosts
│   └── vault.yml             # Encrypted secrets (API keys, passwords)
├── playbooks/
│   ├── main.yml              # The master provisioning playbook
│   ├── github-runner.yml     # Playbook for GitHub Actions runners
│   └── backrest-setup.yml    # Playbook for the backup system
└── roles/
    ├── fresh_install/        # Custom role for initial server setup
    ├── backrest/             # Custom role for configuring backups
    ├── geerlingguy.docker/   # Community role for Docker
    └── geerlingguy.pip/      # Community role for Python pip
Core Roles#
1. The fresh_install Role#
This is the workhorse. It takes a bare Debian VM and transforms it into a fully functional server: Docker installed, users configured, storage set up, the works.
What it does:
- User Management — Creates admin users with SSH key authentication (no passwords)
- System Update and Maintenance — Updates packages and applies security patches
- Essential Tools — Installs jq, yq, curl, git, htop, vim, qemu-guest-agent and other must-haves
- Storage Setup — Configures LVM to use all available disk space
- Docker — Installs Docker Engine and Docker Compose via the geerlingguy.docker role
- User Homedirectory — Sets up ZSH with Oh My Zsh and Powerlevel10k, plus Neovim built from source
- Server Management Web UI — Optionally installs Webmin/Usermin for browser-based system management
- CI/CD — Can deploy a self-hosted GitHub Actions runner
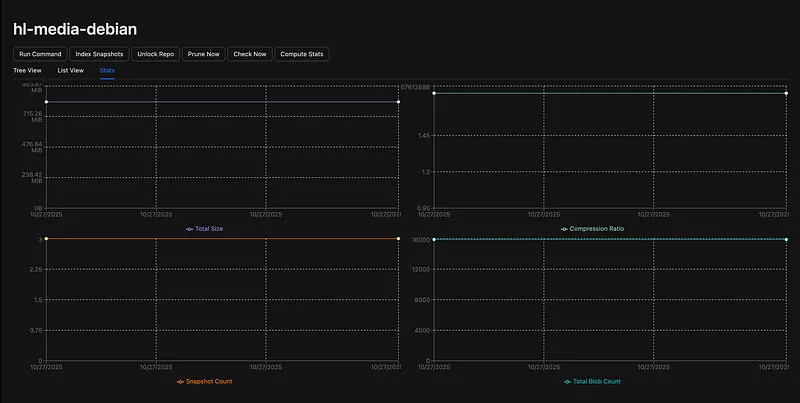
2. The backrest Role#
This role automates Backrest, a modern web UI for restic.
What it does:
- Automated Installation — Downloads and installs Backrest as a systemd service
- Remote Backups — Configures SSH keys for rsync.net (or any remote target)
- Scheduling — Sets up daily backups with retention policies
- Notifications — Integrates with Pushover for backup alerts
By default, it backs up /data and user home directories to remote storage. Set it and forget it.
3. Community Roles (Standing on the Shoulders of Giants)#
I don’t reinvent the wheel. These two community roles are rock-solid:
- geerlingguy.docker — The industry-standard role for installing Docker. Works across Debian, Ubuntu, RedHat, and more. Maintained by Jeff Geerling, who literally wrote the book on Ansible.
- geerlingguy.pip — Ensures Python pip is installed and up-to-date. Simple, essential, reliable.
Running the Playbooks#
Alright, VM template is ready, Ansible roles are configured. Now comes the fun part — actually running this thing.
Before we execute anything, there are two quick setup steps: configuring defaults and securing your secrets.
Step 1: Configure Your Defaults#
Open up the default variables and tweak them to match your environment:
# Review and update the fresh_install role defaults
vim ansible/roles/fresh_install/defaults/main.yml

# Do the same for backrest
vim ansible/roles/backrest/defaults/main.yml
These files control things like usernames, disk paths, backup schedules, and which components get installed. Adjust as needed. Also check the playbook YAML files.
Step 2: Secure Your Secrets with Ansible Vault#
Here’s the important part: never commit secrets to Git. We’ll use Ansible Vault to encrypt everything.
# First, create the vault file:
ansible-vault create group_vars/vault.yml
This will prompt you for a password (remember it!), then open an editor. Add your secrets in this format:
# User passwords for local accounts
sysops_password: "your-secure-password-here"
hacstac_password: "your-secure-password-here" # Create diff admin user

# GitHub secrets for CI/CD runner
# Get these from: https://github.com/YOUR_USERNAME/YOUR_REPO/settings/actions/runners/new
github_runner_token: "your-runner-registration-token"
github_personal_access_token: "ghp_your_personal_access_token"

# Backrest backup configuration
vault_backrest_repo_password: "your-restic-repo-password"
vault_backrest_web_username: "admin"
vault_backrest_web_password_bcrypt: "JDJhJDEwJEUwS3RLcmJsODlhL2lpM0xibW1hV3VlVjAvY2dxazh2OWMvbVcyMEhkLi5ZdXZTeWc1dmRD"

# SSH private key for remote backups (rsync.net, etc.)
vault_backrest_ssh_private_key: |
  -----BEGIN OPENSSH PRIVATE KEY-----
  your-private-key-content-here
  -----END OPENSSH PRIVATE KEY-----

# Pushover notifications (optional)
vault_pushover_user_key: "your-pushover-user-key"
vault_pushover_app_token: "your-pushover-app-token"
Important notes:
- GitHub tokens: Get your runner registration token from Settings > Actions > Runners > New runner
- Backrest password: The
web_password_bcryptneeds to be a bcrypt hash. You can generate one by running Backrest temporarily and copying it from the config, or use an online bcrypt generator - SSH key: This should be your private key for connecting to rsync.net or your remote backup target
Step 3: Edit the Vault Later#
If you need to update secrets later:
# Edit the vault
ansible-vault edit group_vars/vault.yml

# Or if you want to encrypt an existing file
ansible-vault encrypt group_vars/vault.yml

# For convenience, store your vault password in .vault_pass (make sure it's in .gitignore!)
echo "your-vault-password" > .vault_pass
chmod 600 .vault_pass
Step 4: Run the Playbooks#
Now we’re ready to execute.
Full Server Provisioning
This runs the fresh_install role and sets up everything:
ansible-playbook playbooks/main.yml --vault-password-file .vault_pass
Deploy GitHub Actions Runner
Once the base system is ready, deploy the self-hosted runner:
ansible-playbook playbooks/github-runner.yml --vault-password-file .vault_passThis installs and configures a GitHub Actions runner that will appear in your repository’s Actions settings.
Set Up Backups
Finally, configure the backup system:
ansible-playbook playbooks/backrest-setup.yml --vault-password-file .vault_passStep 5: Verify Everything#
# Check Docker
docker --version

# Check GitHub runner status
sudo /opt/actions-runner/svc.sh status

# Check Backrest service
systemctl status backrest

# Access Backrest web UI
# http://your-server-ip:9898
That’s it. Your server is fully provisioned, automated, and ready to run Docker stacks.
Doppler: Never Commit Secrets Again#
Doppler is a managed secrets service that keeps all your API keys, passwords, and credentials completely out of your Git repository.
The best part? It automatically syncs secrets to GitHub Actions, so your CI/CD pipeline has access to everything it needs without you ever hardcoding a single value.
Let me walk you through the setup.
Step 1: Sign Up for Doppler#
Head over to https://doppler.com ⤴ and create a free account. The free tier is more than enough for personal homelabs.
Step 2: Install the Doppler GitHub App#
- Go to your Doppler dashboard
- Navigate to Integrations → GitHub
- Click Install GitHub App
- Important: Only grant access to the specific repository you’re working with (e.g., homelab-media-stack)
This integration allows Doppler to sync secrets directly to your GitHub repository as Actions secrets.
Step 3: Create a Doppler Project#
Back in the Doppler dashboard:
- Click Create Project
- Name it something descriptive (e.g., homelab-media-stack or media-server)
- Choose an environment
Step 4: Configure GitHub Sync#
Now connect Doppler to your GitHub repository:
- In your Doppler project, go to Integrations
- Select GitHub Actions
- Choose your repository from the dropdown
- Enable Automatic Sync
That’s it. Now any secret you add to Doppler will automatically appear as a GitHub Actions secret.
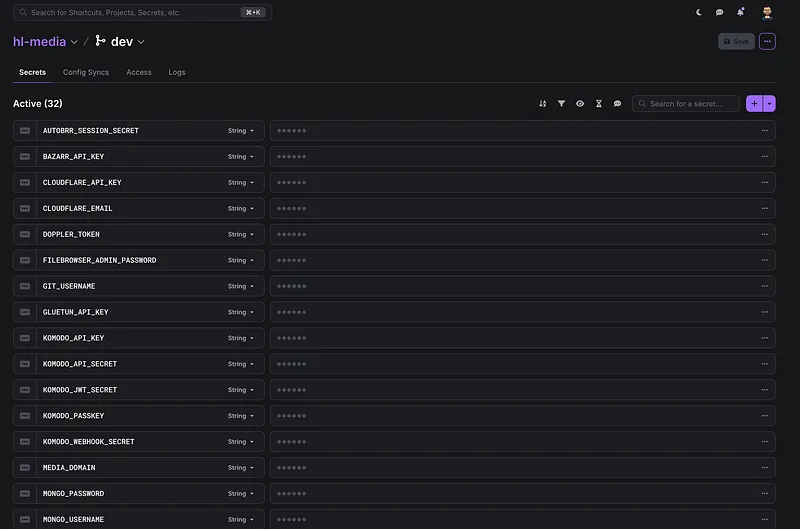
Step 5: Add Your Secrets#
Time to populate your secrets. In your Doppler project, add all the sensitive values your stack needs.
Example secrets to add:
CLOUDFLARE_API_TOKEN=your-cloudflare-token
PUSHOVER_USER_KEY=your-pushover-key
PUSHOVER_APP_TOKEN=your-pushover-token
As soon as you save these in Doppler, they’ll automatically sync to your GitHub repository as Actions secrets. No manual copying. No risk of accidentally committing them.
Step 6: Verify the Sync#
Check that everything synced correctly:
- Go to your GitHub repository
- Navigate to Settings → Secrets and variables → Actions
- You should see all your Doppler secrets listed there
The secrets are never written to logs, never committed to Git, and never exposed in your repository. Doppler handles everything securely.
Why This Matters#
Before Doppler:
- Secrets scattered across multiple places
- Manual copying to GitHub Actions
- Risk of accidentally committing .env files
- No audit trail of who changed what
After Doppler:
- Single source of truth for all secrets
- Automatic sync to GitHub (and other services)
- Zero risk of Git exposure
- Full audit log of changes
- Easy rotation and updates
Update a secret in Doppler? It syncs to GitHub automatically. Revoke access? One click. Need to rotate an API key? Change it once, and it updates everywhere.
Security Considerations#
Doppler’s approach is simple and effective — it provides a straightforward way to manage secrets with excellent developer experience and seamless integrations.
However, as a managed service, there’s an inherent trade-off: your secrets live on external infrastructure. For a homelab, this is generally acceptable, but it’s worth considering:
- Security model: How are secrets encrypted? Who has access?
- Trust boundary: Are you comfortable with a third party handling your credentials?
- Vendor lock-in: What happens if the service changes or shuts down?
Doppler addresses these concerns with SOC 2 compliance, end-to-end encryption, and transparent security practices. For most use cases, it’s more secure than rolling your own solution.
Self-Hosted Alternatives#
If you prefer full control, consider these alternatives:
- Infisical — Open-source, self-hostable, Doppler-like UX
- SOPS — Git-native encryption from Mozilla
- Vault — Enterprise-grade from HashiCorp (heavier operational burden)
I’ll be evaluating Infisical and SOPS in the coming weeks to see how they compare for homelab workflows.
GitHub Actions & Komodo: CI/CD for Docker Stacks#
Alright, secrets are managed. Infrastructure is automated. Now let’s talk about the deployment pipeline.
This is where GitHub Actions and Komodo work together to create a fully automated GitOps workflow. Every time I push to the main branch, my entire stack gets linted, security-scanned, and deployed — no manual intervention required.
The setup uses a self-hosted GitHub Actions runner (remember, we deployed this with Ansible), which means the pipeline runs directly on my homelab server. This gives me access to local resources, faster builds, and no secrets leaving my network.
The Three-Phase Pipeline#
Phase 1: Lint and Test#
- Docker Compose syntax validation
- YAML linting (yamllint)
- GitHub Actions workflow validation (actionlint)
- Conventional commit enforcement (Commitizen)
- Initial secret detection (pre-commit hooks)
Phase 2: Security Scan#
- Deep secret scanning with TruffleHog
- Full Git history analysis
- Detection of API keys, tokens, and credentials
Phase 3: Deploy#
- Secret propagation from GitHub Actions to .env files
- Network creation (Traefik proxy network)
- Sequential deployment: Traefik → Komodo → Application stacks
- Komodo resource sync execution
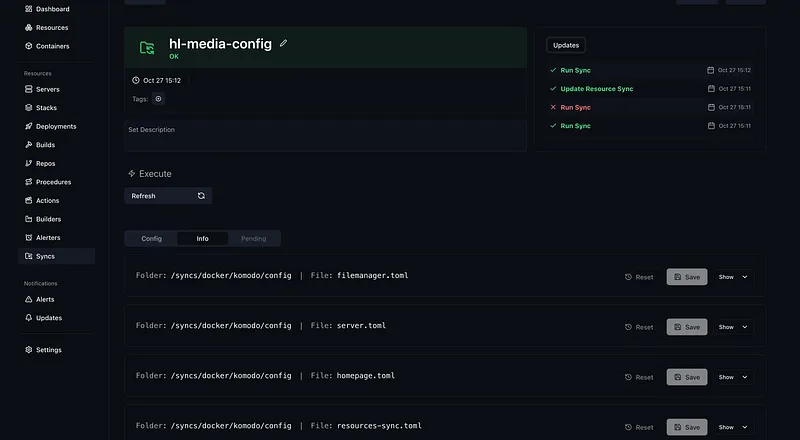
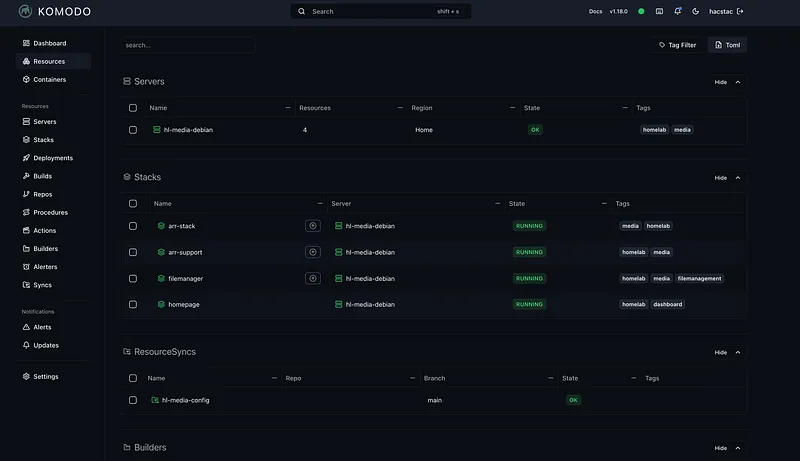
Komodo Resource Sync#
Komodo’s Resource Sync feature enables GitOps for Docker stacks. TOML configuration files define all resources (stacks, servers, deployments), and Komodo automatically reconciles the desired state with reality.
[[server]]
name = "hl-media-debian"
tags = ["homelab", "media"]

[server.config]
address = "https://periphery:8120"
region = "Home"
enabled = true
cpu_warning = 85.0
cpu_critical = 95.0

[[stack]]
name = "arr-stack"
description = "Arr* Apps"
tags = ["media", "homelab"]
[stack.config]
server = "hl-media-debian"
project_name = "arr-stack"
poll_for_updates = true
files_on_host = true
run_directory = "/homelab/docker/arr-stack"
file_paths = [
  "docker-compose.vpn.yml",
  "docker-compose.downloaders.yml",
  "docker-compose.arrs.yml"
]

##

[[stack]]
name = "arr-support"
tags = ["homelab", "media"]
[stack.config]
server = "hl-media-debian"
project_name = "arr-stack"
poll_for_updates = true
files_on_host = true
run_directory = "/homelab/docker/arr-stack"
file_paths = [
  "docker-compose.extended.yml",
  "docker-compose.autobrr.yml"
]
extra_args = ["--force-recreate"]

##

[[stack]]
name = "filemanager"
tags = [
  "homelab",
  "media",
  "filemanagement"
]
[stack.config]
server = "hl-media-debian"
project_name = "file-management"
poll_for_updates = true
files_on_host = true
run_directory = "/homelab/docker/filemanager"
file_paths = ["docker-compose.yml"]

##

[[stack]]
name = "homepage"
description = "homepage"
tags = ["homelab", "dashboard"]
[stack.config]
server = "hl-media-debian"
project_name = "arr-stack"
poll_for_updates = true
files_on_host = true
run_directory = "/homelab/docker/homepage"
file_paths = ["docker-compose.yml"]
Changes to TOML configs trigger automatic resource updates — no manual intervention required.
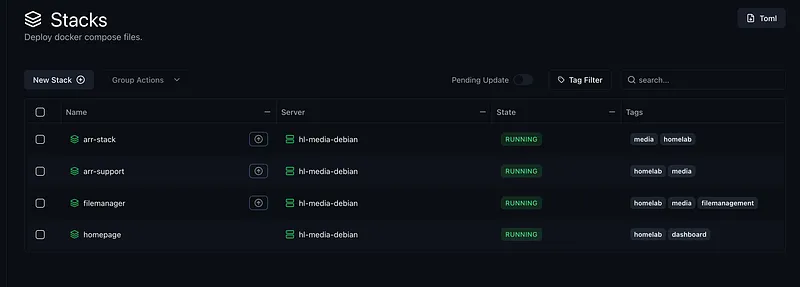
Workflow Summary#
- Push to main branch
- Self-hosted runner executes pipeline
- Validation → Security scan → Deploy
- Komodo syncs resources from config
- All stacks deployed and operational
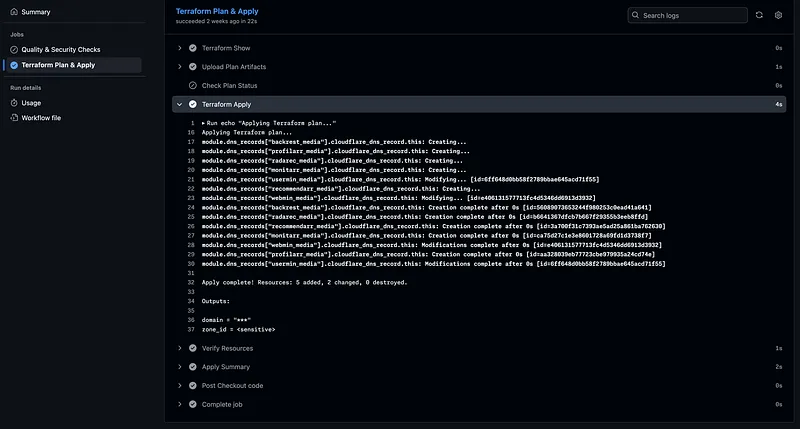
DNS: Cloudflare + Terraform#
Using Terraform with a GitHub Actions pipeline to sync DNS records across the homelab.
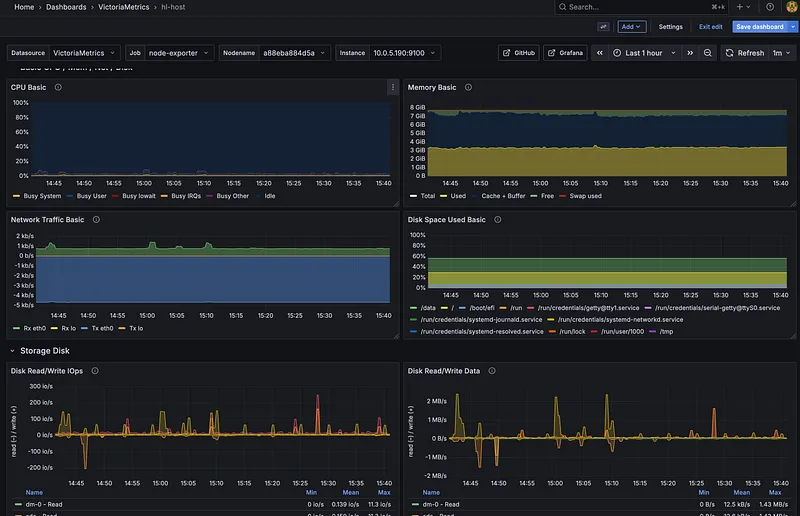
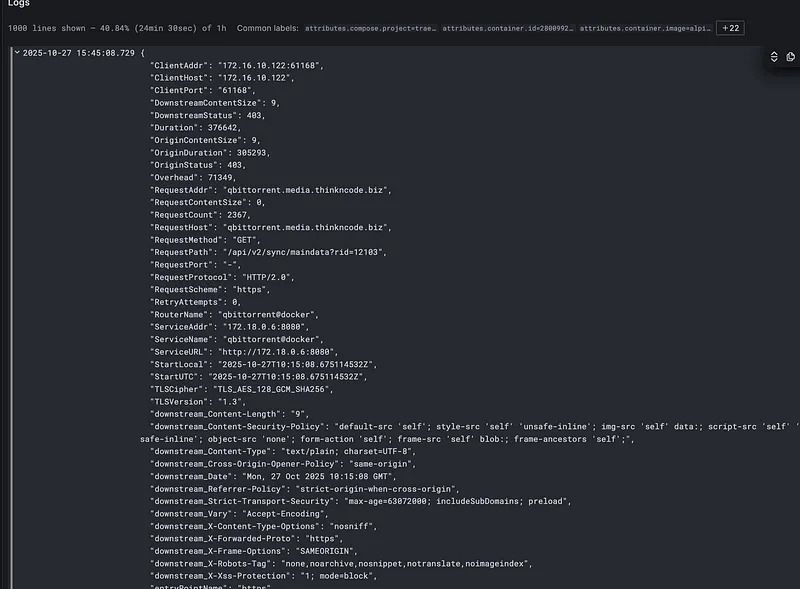
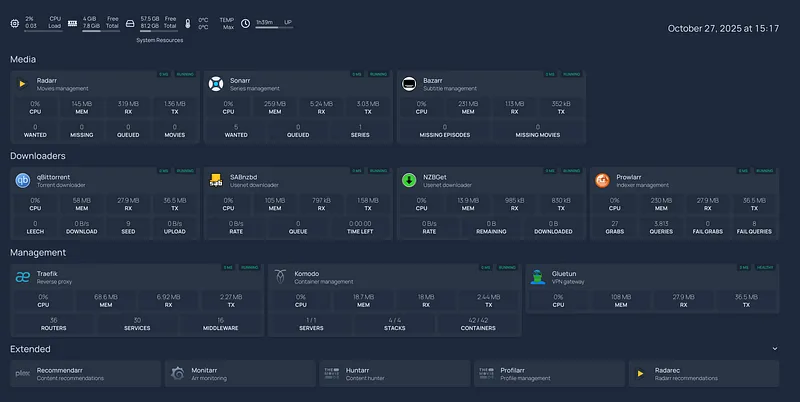
Observability#
Metrics Collection#
- Node Exporter — System metrics (CPU, memory, disk, network)
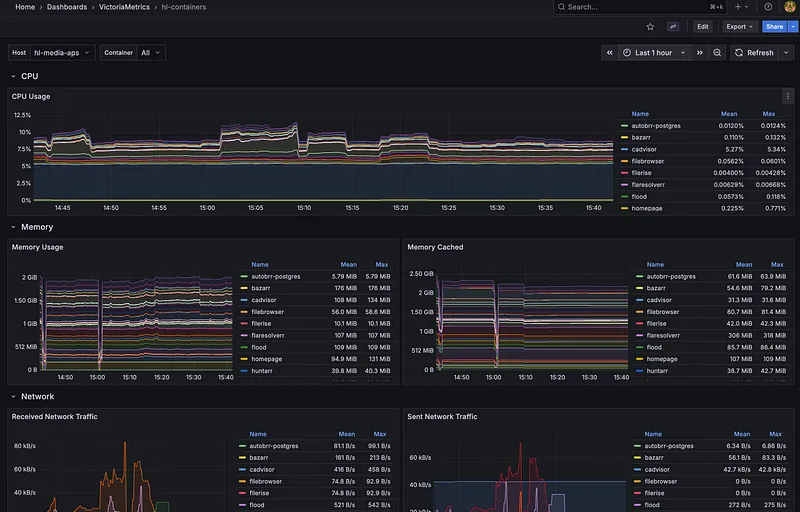
- cAdvisor — Container metrics (Docker resource usage)
- Exportarr (github.com/onedr0p/exportarr ⤴) — Metrics from Sonarr, Radarr, Prowlarr, and other arr apps
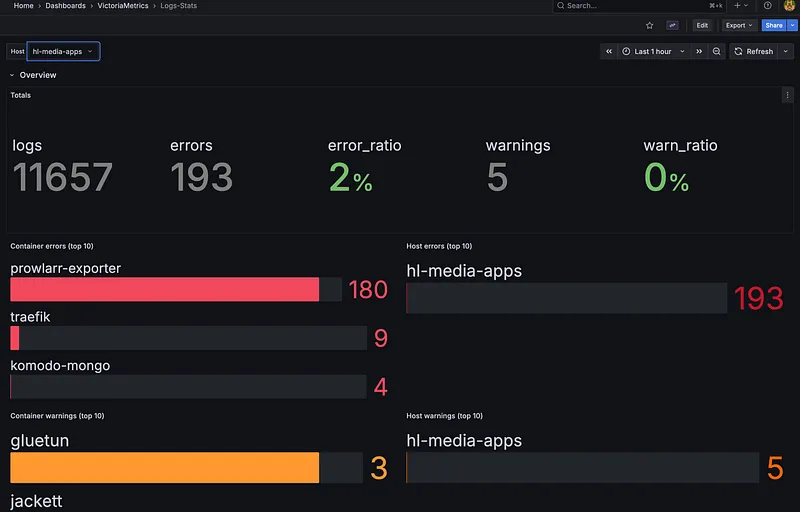
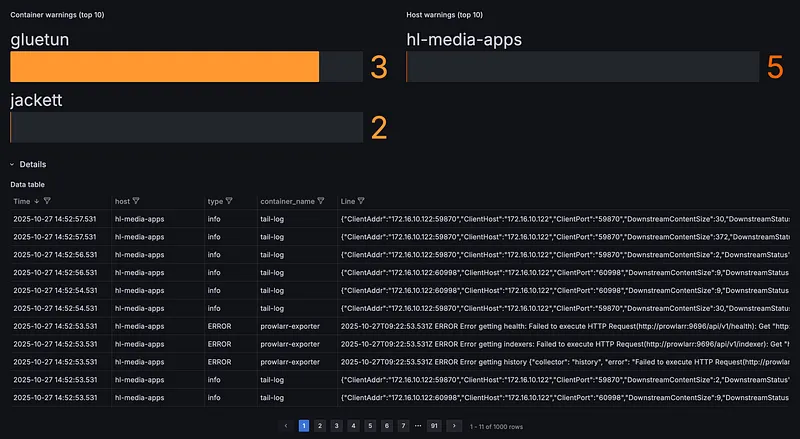
Log & Metric Shipping#
- Vector — Collects logs from all containers and ships them to VictoriaLogs, plus transforms metrics for VictoriaMetrics
Storage & Visualization#
- VictoriaMetrics — Time-series database for metrics (Prometheus-compatible, but more efficient)
- VictoriaLogs — Log aggregation and search
- Both run on a separate observability server for isolation
The Flow:
Docker Containers → Vector → VictoriaMetrics/VictoriaLogs → Grafana DashboardsThe Problem: Too Much Noise#
Here’s the thing: exporters generate a ton of unnecessary metrics. Node Exporter alone outputs hundreds of metrics, most of which I’ll never look at. Same with cAdvisor and the arr exporters. This creates noise, wastes storage, and makes dashboards cluttered.
Future: OpenTelemetry Migration#
I’m planning to migrate to OpenTelemetry (OTel) in the coming weeks. Here’s why:
- Unified agent for logs and metrics
- Metric filtering and transformation
- Reduced storage overhead
- Better resource efficiency
- Vendor-neutral telemetry pipeline
OpenTelemetry configuration allows fine-grained control over which metrics are collected and stored, eliminating noise from the pipeline.