Supercharge Postgres on K8s: A CNPG PostgreSQL + Pigsty Observability Guide
Tired of surface-level metrics? Learn how to leverage the most powerful PostgreSQL exporter to gain complete visibility into your…
If you’re using CloudNativePG (CNPG) to manage your PostgreSQL clusters, you already know it’s a powerful tool. When it comes to monitoring, CNPG provides some great, detailed metrics and even includes a handy dashboard for a high-level overview of your cluster’s health. That’s perfect for a quick check-in.
But what if you need to go deeper? What if you want to troubleshoot performance issues without having to build a ton of custom dashboards from scratch?
That’s where this guide comes in. I’ll show you how to supercharge your setup by combining CNPG with the Pigsty exporter. This approach gives you the best of both worlds: you get to keep CNPG’s excellent summary dashboard while adding Pigsty’s massive collection of pre-built, in-depth dashboards. It’s the perfect combination for everything from a quick health check to a deep-dive investigation.
With this in place, tracking tricky issues like slow queries and long-running transactions becomes much, much easier.
To build this whole setup, we’ll be using a modern, open-source stack. Here’s a look at the tools we’ll be implementing together:
- OpenBao instead of HashiCorp Vault for secrets management.
- The External Secrets Operator to get those secrets to our applications.
- RustFS as a simple object storage solution for our backups.
Ready to get started? Let’s begin with the first piece of our stack: openbao.
Step 1: Let’s Get OpenBao Set Up#
First up, we need to handle our secrets, like database passwords. For that, we’re going to use OpenBao.
Think of OpenBao as a community-driven, open-source version of HashiCorp Vault. It’s backed by the Linux Foundation, which is great because it shows a real commitment to keeping it open for everyone.
For this guide, we’ll run it in a high-availability (HA) mode, so it’s nice and resilient. We’ll use its built-in Raft storage and set it to “auto-unseal” with a simple key. This setup is perfect for a lab, but just a heads-up: for a real production system, you’d want to use something more heavy-duty like a Key Management Service (KMS) to unseal it.
Later on, I’ll show you how we can use OpenBao with both the Secrets Store CSI driver and the External Secrets Operator to get secrets to our apps.
# Installation Quickstart
https://openbao.org/docs/platform/k8s/helm/

# CSI
helm repo add secrets-store-csi-driver https://kubernetes-sigs.github.io/secrets-store-csi-driver/charts
helm install csi-secrets-store secrets-store-csi-driver/secrets-store-csi-driver --namespace kube-system

# Create secret for static unseal key
openssl rand -out unseal-umbrella-1.key 32
kubectl create secret generic unseal-key --from-file=unseal-umbrella-1.key=./unseal-umbrella-1.key

---values.yml
...
  server:
    enabled: true
    image:
      repository: "openbao/openbao-nightly"
      tag: "2.4.0-nightly1756043023"
    volumes:
      - name: unseal-key
        secret:
          secretName: unseal-key
    volumeMounts:
      - mountPath: /keys
        name: unseal-key
        readOnly: true
    ha:
      enabled: true
      replicas: 3
      raft:
        enabled: true
        config: |
          ui = true
          listener "tcp" {
            tls_disable = 1
            address = "[::]:8200"
            cluster_address = "[::]:8201"
          }
          storage "raft" {
            path = "/openbao/data"
          }
          seal "static" {
            current_key_id = "umbrella-1"
            current_key = "file:///keys/unseal-umbrella-1.key"
          }
          service_registration "kubernetes" {}

  ui:
    enabled: true

  csi:
    enabled: true
...
Step 2: Setting Up Our Object Storage with RustFS#
Alright, next up is a spot to keep our database backups and WAL archives. We’ll be using a cool little tool called RustFS. It’s an S3-compatible object storage server that’s written in Rust, which makes it super lightweight and fast.
Now, before we go any further, here’s a very important heads-up.
⚠️ Production Warning: RustFS is still under active development, so you should not use it for any production workloads. It’s perfect for a lab environment or a tutorial like this one. For any real-world applications, you’ll want to implement a battle-tested solution like MinIO, SeaweedFS, or your cloud provider’s S3 service.
Alright, with that crucial point out of the way, let’s talk about the setup. For this tutorial, I’m running RustFS in a simple deployment mode with a single persistent volume and using volume snapshots for backups. However, it’s worth noting that RustFS is designed with a distributed architecture for large-scale deployments. Once the project matures, it will be exciting to test its distributed capabilities against a tool like MinIO.
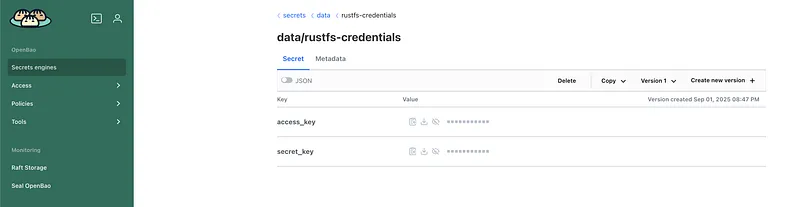
So, how do we securely give our applications the credentials for RustFS? For the accessKey and secretKey, we’ll use a neat trick with the Secrets Store CSI driver. We’ll create a resource called a SecretProviderClass that tells the driver to fetch the credentials directly from OpenBao. It then does two things for us at once: mounts the keys as files inside our pod and also creates a native Kubernetes Secret from them. It’s a really clean way to handle it.
apiVersion: v1
kind: Namespace
metadata:
  name: rustfs
---
apiVersion: secrets-store.csi.x-k8s.io/v1
kind: SecretProviderClass
metadata:
  name: bao-rustfs-creds
  namespace: rustfs
spec:
  provider: vault
  parameters:
    roleName: "rustfs-role"
    vaultAddress: "http://openbao.openbao.svc.cluster.local:8200"
    objects: |
      - objectName: "rustfsAccessKey"
        secretPath: "secrets/data/rustfs-credentials"
        secretKey: "access_key"
      - objectName: "rustfsSecretKey"
        secretPath: "secrets/data/rustfs-credentials"
        secretKey: "secret_key"
  secretObjects:
  - secretName: rustfs-csi-secret
    type: Opaque
    data:
    - key: RUSTFS_ACCESS_KEY
      objectName: "rustfsAccessKey"
    - key: RUSTFS_SECRET_KEY
      objectName: "rustfsSecretKey"
---
apiVersion: v1
kind: ConfigMap
metadata:
  name: rustfs-config
  namespace: rustfs
data:
  RUSTFS_VOLUMES: "/data"
  RUSTFS_ADDRESS: "0.0.0.0:7000"
  RUSTFS_CONSOLE_ENABLE: "true"
  RUSTFS_CONSOLE_ADDRESS: "0.0.0.0:7001"
---
apiVersion: v1
kind: PersistentVolumeClaim
metadata:
  name: rustfs-data-pvc
  namespace: rustfs
spec:
  accessModes:
    - ReadWriteOnce
  storageClassName: openebs-lvm
  resources:
    requests:
      storage: 40Gi
---
apiVersion: apps/v1
kind: Deployment
metadata:
  name: rustfs
  namespace: rustfs
  labels:
    app: rustfs
spec:
  replicas: 1
  selector:
    matchLabels:
      app: rustfs
  template:
    metadata:
      labels:
        app: rustfs
    spec:
      securityContext:
        fsGroup: 1000
      containers:
        - name: rustfs
          image: rustfs/rustfs:1.0.0-alpha.39
          imagePullPolicy: IfNotPresent
          ports:
            - name: api
              containerPort: 7000
            - name: console
              containerPort: 7001
          envFrom:
            - configMapRef:
                name: rustfs-config
            - secretRef:
                name: rustfs-csi-secret
          volumeMounts:
            - name: data
              mountPath: /data
            - name: secrets-store-inline
              mountPath: "/mnt/secrets-store"
              readOnly: true
      volumes:
        - name: data
          persistentVolumeClaim:
            claimName: rustfs-data-pvc
        - name: secrets-store-inline
          csi:
            driver: secrets-store.csi.k8s.io
            readOnly: true
            volumeAttributes:
              secretProviderClass: "bao-rustfs-creds"
---
apiVersion: v1
kind: Service
metadata:
  name: rustfs-service
  namespace: rustfs
spec:
  selector:
    app: rustfs
  ports:
    - name: api
      protocol: TCP
      port: 7000
      targetPort: 7000
    - name: console
      protocol: TCP
      port: 7001
      targetPort: 7001
Step 3: Syncing Secrets with External Secrets Operator#
So, we have our secrets safely stored in OpenBao, but how do our apps actually use them without needing to talk to OpenBao directly? This is where the External Secrets Operator (ESO) comes in, and it’s one of the simplest and most stable solutions out there for this problem.
The idea is brilliant: you create a special resource in Kubernetes that just points to a secret in OpenBao. The operator sees it, securely fetches the secret for you, and creates a regular Kubernetes Secret that it keeps in sync. Your app just uses the native secret and doesn’t even know OpenBao exists! It also supports a ton of other backends, making it super flexible.
Now, let’s get it set up and see how it works.
# Installtion QuickStart
https://external-secrets.io/latest/introduction/getting-started/
# PasswordGenerator for PostgreSQL
---
apiVersion: generators.external-secrets.io/v1alpha1
kind: Password
metadata:
name: pg-password-generator
namespace: postgres
spec:
length: 20
digits: 5
symbols: 0
noUpper: false
allowRepeat: true
---
# SecretStore with vault backend
---
apiVersion: external-secrets.io/v1
kind: SecretStore
metadata:
name: vault-backend
spec:
provider:
vault:
server: "http://openbao.openbao.svc:8200"
path: "secrets"
version: "v2"
auth:
kubernetes
role: "openbao-readonly"
mountPath: "kubernetes"
serviceAccountRef:
name: "openbao-sa"
---
# SuperUser Secret
---
apiVersion: external-secrets.io/v1
kind: ExternalSecret
metadata:
name: psql-superuser-secret
namespace: postgres
spec:
refreshInterval: "24h"
target:
name: cluster-superuser
creationPolicy: Owner
template:
data:
username: "postgres"
password: "{{ .password }}"
dataFrom:
- sourceRef:
generatorRef:
apiVersion: generators.external-secrets.io/v1alpha1
kind: Password
name: pg-password-generator
rewrite:
- regexp:
source: "(.*)"
target: "password"
---
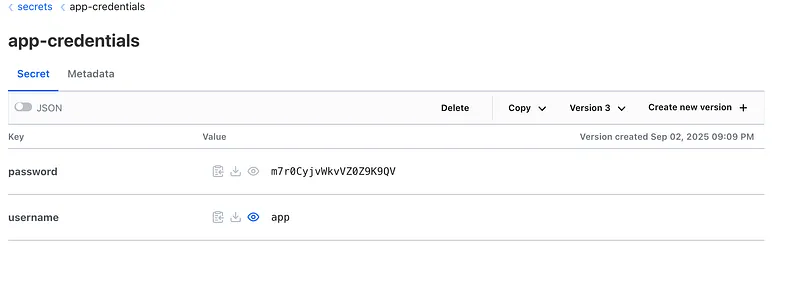
# AppUser Secret
---
apiVersion: external-secrets.io/v1
kind: ExternalSecret
metadata:
name: psql-app-user-secret
namespace: postgres
spec:
refreshInterval: "24h"
target:
name: cluster-app-user
creationPolicy: Owner
template:
data:
username: "app"
password: "{{ .password }}"
dataFrom:
- sourceRef:
generatorRef:
apiVersion: generators.external-secrets.io/v1alpha1
kind: Password
name: pg-password-generator
rewrite:
- regexp:
source: "(.*)"
target: "password"
---
# Push to vault
---
apiVersion: external-secrets.io/v1alpha1
kind: PushSecret
metadata:
name: push-superuser-to-vault
namespace: postgres
spec:
deletionPolicy: Delete
refreshInterval: 1h
secretStoreRefs:
- name: vault-backend
kind: SecretStore
selector:
secret:
name: cluster-superuser
data:
- match:
remoteRef:
remoteKey: postgres-credentials
---
apiVersion: external-secrets.io/v1alpha1
kind: PushSecret
metadata:
name: push-app-user-to-vault
namespace: postgres
spec:
deletionPolicy: Delete
refreshInterval: 1h
secretStoreRefs:
- name: vault-backend
kind: SecretStore
selector:
secret:
name: cluster-app-user
data:
- match:
remoteRef:
remoteKey: app-credentials
---
Step 4: Time for the Star of the Show — CloudNativePG (CNPG)#
With our secrets and storage ready to go, it’s time to bring in the star of the show: CloudNativePG (CNPG).
If you haven’t used it before, think of CNPG as an expert robot pilot for your PostgreSQL database. You just tell it what you want, a highly available, production-ready cluster, and it handles all the complicated stuff for you: setup, making sure it never goes down, handling failures, and, of course, taking backups.
Our mission now is to launch a new Postgres cluster and wire it up to the tools we just set up. It will use RustFS to store its backups and talk to OpenBao to get its main password.
Let’s dive in and spin up our database!
## Installation QuickStart
https://cloudnative-pg.io/documentation/1.17/installation_upgrade/

## Barman Operator
# Install cert-manager
kubectl apply -f https://github.com/cert-manager/cert-manager/releases/download/v1.18.2/cert-manager.yaml

# cmctl
brew install cmctl
cmctl check api

# Install barman operator
kubectl apply -f \
        https://github.com/cloudnative-pg/plugin-barman-cloud/releases/download/v0.6.0/manifest.yaml

---

## ObjectStore for Barman
# Create a accessKey and secretKey in rustfs ui console and store in openbao, and create same ES to create k8s secret!

---objectStore.yml
apiVersion: barmancloud.cnpg.io/v1
kind: ObjectStore
metadata:
  name: rustfs-s3-ap
spec:
  retentionPolicy: "30d"
  configuration:
    destinationPath: s3://ar-cnpg-backup/hl-cnpg-cluster/
    endpointURL: http://rustfs-service.rustfs.svc:7000
    s3Credentials:
      accessKeyId:
        name: backup-creds
        key: accessKey
      secretAccessKey:
        name: backup-creds
        key: secretKey
    wal:
      encryption:
      compression: gzip
    data:
      encryption:
      compression: gzip
---


---cluster.yml
apiVersion: postgresql.cnpg.io/v1
kind: Cluster
metadata:
  name: psql-cluster
spec:
  description: "dev cluster"
  imageName: ghcr.io/cloudnative-pg/postgresql:16.3
  instances: 3
  startDelay: 300
  stopDelay: 300
  primaryUpdateStrategy: unsupervised
  postgresql:
    parameters:
      shared_buffers: '256MB'
      max_connections: '200'
      effective_cache_size: '768MB'
      maintenance_work_mem: '128MB'
      work_mem: '4MB'
      min_wal_size: '1GB'
      max_wal_size: '2GB'
      wal_buffers: '16MB'
      pg_stat_statements.max: '10000'
      pg_stat_statements.track: all
      auto_explain.log_min_duration: '10s'
      pg_stat_statements.max: "10000"
      pg_stat_statements.track: all
      track_io_timing: 'on'
    pg_hba:
      - host all all 0.0.0.0/0 trust
  bootstrap:
    initdb:
      database: app
      owner: app
      secret:
        name: cluster-app-user
  superuserSecret:
    name: cluster-superuser
  storage:
    storageClass: openebs-lvm
    size: 5Gi
  plugins:
  - name: barman-cloud.cloudnative-pg.io
    isWALArchiver: true
    parameters:
      barmanObjectName: rustfs-s3-ap
  resources:
    requests:
      memory: "384Mi"
      cpu: "200m"
    limits:
      memory: "1Gi"
      cpu: "2"
---

## Connection Pooler
---pooler.yml
apiVersion: postgresql.cnpg.io/v1
kind: Pooler
metadata:
  name: pooler-psql-cluster
spec:
  cluster:
    name: psql-cluster
  instances: 2
  pgbouncer:
    poolMode: session
    parameters:
      max_client_conn: "1000"
      default_pool_size: "10"
  type: rw
  serviceTemplate:
    metadata:
      labels:
        app: pooler
    spec:
      type: LoadBalancer
---

## Manual Backup
---backup.yml
apiVersion: postgresql.cnpg.io/v1
kind: Backup
metadata:
  name: backup-300825
spec:
  cluster:
    name: psql-cluster
  method: plugin
  pluginConfiguration:
    name: barman-cloud.cloudnative-pg.io
---
Step 5: Setting Up Our Monitoring (Observability)#
Alright, our database is up and running, but how do we know what it’s actually doing? It’s time to set up some monitoring so we can peek inside.
For this guide, we’re actually going to set up two ways to get metrics:
- CNPG’s built-in metrics: These are great for understanding the health of the cluster itself — things like replication, backups, and the number of connections.
- The Pigsty exporter: This is our secret weapon for deep-diving into database performance, like finding slow queries and tracking query statistics.
A Quick Note on Production: In our lab, running both is fine. For a real production system, you’d probably want to pick just one and tune it carefully. Scraping too many metrics too often can put extra load on your database and your monitoring system, so you’d want to grab only the metrics that give you real, actionable knowledge.
Getting CNPG’s Metrics#
This is the easy part. The CNPG pods are already exposing a bunch of useful metrics. We just need to tell our Prometheus monitoring system how to find them. The best way to do that is with a resource called a PodMonitor.
Here are the two PodMonitors we’ll use. The first one scrapes the metrics from our actual database pods, and the second one gets metrics from the CNPG operator itself.
# Scrapes metrics from the database pods
apiVersion: monitoring.coreos.com/v1
kind: PodMonitor
metadata:
  name: psql-cluster-podmonitor
  namespace: postgres
  labels:
    # This label helps Prometheus find it
    release: kube-prometheus-stack
spec:
  podMetricsEndpoints:
  - port: metrics
  selector:
    matchLabels:
      cnpg.io/cluster: psql-cluster
      cnpg.io/podRole: instance
---
# Scrapes metrics from the CNPG operator pod
apiVersion: monitoring.coreos.com/v1
kind: PodMonitor
metadata:
  name: cnpg-controller-manager
  namespace: cnpg-system
spec:
  podMetricsEndpoints:
  - port: metrics
  selector:
    matchLabels:
      app.kubernetes.ioio/name: cloudnative-pg
Adding the Pigsty Exporter for Deep Insights#
While CNPG’s metrics are great for cluster health, the Pigsty exporter is how we’ll understand what’s happening inside the database. It gives us incredible detail on query performance, which is a lifesaver for finding slow queries or figuring out why the database is working so hard.
Before the exporter can work its magic, we need to flip a few switches inside PostgreSQL to tell it to start tracking these detailed stats. Specifically, we need to:
- Enable
pg_stat_statements: A super useful extension that tracks execution statistics for all queries. - Enable
track_io_timing: This tells Postgres to measure exactly how much time is spent waiting on the disk, which is often a major performance bottleneck. - Set thresholds: Configure things like auto_explain.log_min_duration to automatically log queries that take too long.
The great thing about CNPG is that we can turn all of this on directly in our cluster’s configuration. Here’s what that looks like in the YAML:
# ... inside your Cluster manifest's spec.postgresql.parameters section
pg_stat_statements.max: "10000"
pg_stat_statements.track: all
auto_explain.log_min_duration: '10s'
track_io_timing: 'on'
Now that we’ve flipped the right switches inside Postgres, it’s time to configure the Pigsty exporter itself. This is the tool that will actually query the database for all those juicy stats and serve them up for Prometheus to scrape.
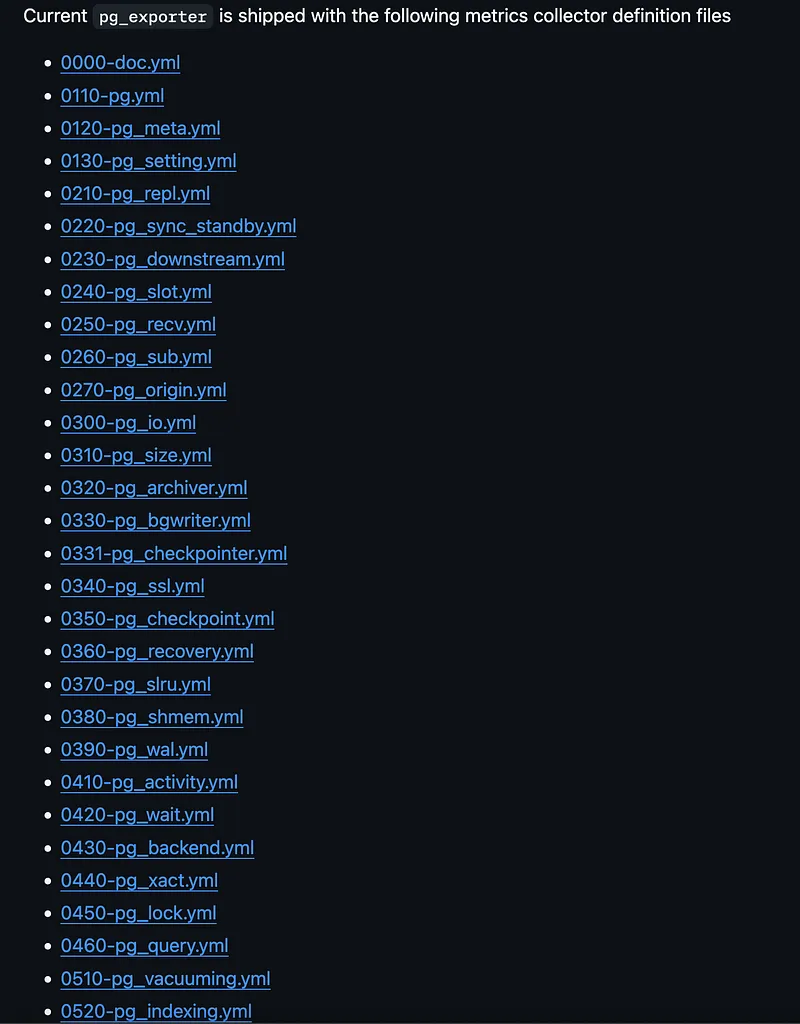
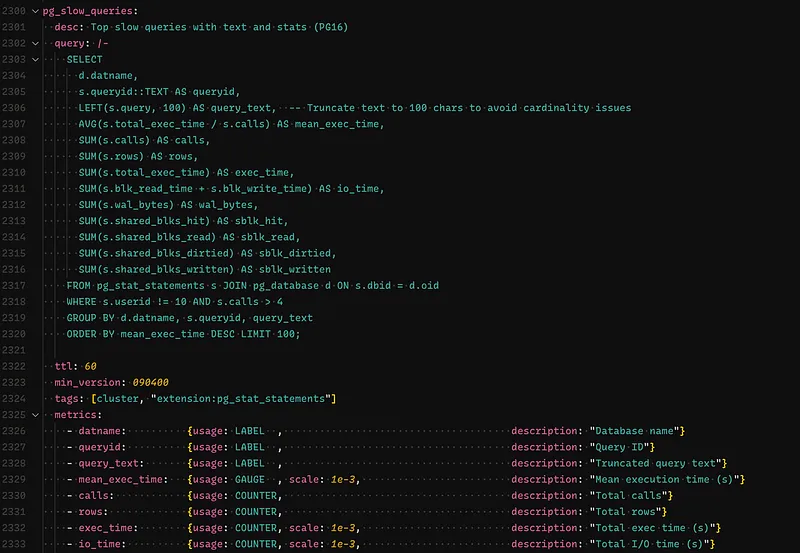
Pigsty comes with a huge list of pre-defined metric collectors right out of the box, covering everything from replication to vacuuming. For our setup, we’ll use the main configuration file and also add our own custom one to specifically track slow queries, which is a super common pain point.
What’s great is that Pigsty has a really easy method for adding custom definitions. I’m using a custom query that fetches slow queries from the pg_stat_statements view. This query includes a smart trick: it truncates the query text. This is a crucial step to avoid high cardinality issues, which is a fancy way of saying we prevent our monitoring system from getting overwhelmed by treating every slightly different query as a unique new metric.
Handling the Database Connection Secret#
Okay, now for the most important part: we need to give the exporter a password so it can talk to our database. This is done with a connection string, which the exporter expects in an environment variable called PG_EXPORTER_URL.
Instead of just typing out a password in a file (which is a big no-no!), we’re going to use a much smarter and more secure method with the External Secrets Operator (ESO).
Here’s the plan:
- We’ll assume our main database username and password are already stored safely in OpenBao/Vault.
- We’ll create an ExternalSecret resource in Kubernetes.
- This resource will tell ESO to go fetch the username and password, use a template to build the full PG_EXPORTER_URL string, and then create a brand new Kubernetes Secret with the final result.
⚠️ A Quick Security Note: For this demo, I’m using the powerful superuser credentials to connect. In a real-world setup, you should always create a dedicated monitoring user that has just enough permissions to read the stats it needs (least privilege). It’s way safer!
Refer this doc to create a dedicate monitoring user: https://github.com/pgsty/pg_exporter/blob/main/docs/deploy.md ⤴
apiVersion: external-secrets.io/v1beta1
kind: ExternalSecret
metadata:
  name: pg-exporter-creds
  namespace: postgres
spec:
  secretStoreRef:
    name: vault-backend
    kind: SecretStore
  target:
    name: pg-exporter-creds
    creationPolicy: Owner
    template:
      data:
        PG_EXPORTER_URL: "postgres://{{ .username }}:{{ .password }}@psql-cluster-restore-rw.postgres.svc:5432/postgres"
  data:
    - secretKey: username
      remoteRef:
        key: secrets/postgres-credentials
        property: username
    - secretKey: password
      remoteRef:
        key: secrets/postgres-credentials
        property: password
Push this also to openbao:
apiVersion: external-secrets.io/v1alpha1
kind: PushSecret
metadata:
  name: push-pg-exporter-creds
  namespace: postgres
spec:
  deletionPolicy: Delete
  refreshInterval: 1h
  secretStoreRefs:
    - name: vault-backend
      kind: SecretStore
  selector:
    secret:
      name: pg-exporter-creds
  data:
    - match:
        remoteRef:
          remoteKey: secrets/pg-exporter-url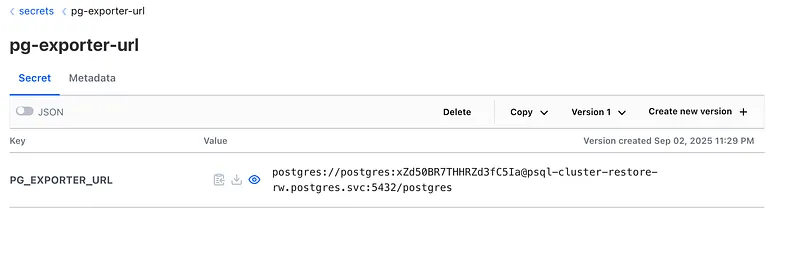
Alright, with our pg-exporter-creds secret all sorted out, it’s time to actually deploy the Pigsty exporter.
Let’s get this thing running!
# Create config map from pg_exporter.yml
kubectl create configmap pg-exporter-config --from-file=pg_exporter.yml

---pigsty_exporter.yml
apiVersion: apps/v1
kind: Deployment
metadata:
  name: pg-exporter
spec:
  replicas: 1
  selector:
    matchLabels:
      app: pg-exporter
  template:
    metadata:
      labels:
        app: pg-exporter
    spec:
      containers:
        - name: exporter
          image: pgsty/pg_exporter:1.0.2-amd64
          ports:
            - containerPort: 9630
              name: metrics
          env:
            - name: PG_EXPORTER_URL
              valueFrom:
                secretKeyRef:
                  name: pg-exporter-creds
                  key: PG_EXPORTER_URL
            - name: PG_EXPORTER_CONFIG
              value: "/config/pg_exporter.yml"
          volumeMounts:
            - name: config-volume
              mountPath: /config
      volumes:
        - name: config-volume
          configMap:
            name: pg-exporter-config
---
apiVersion: v1
kind: Service
metadata:
  name: pg-exporter
  labels:
    app: pg-exporter
spec:
  selector:
    app: pg-exporter
  ports:
    - name: metrics
      protocol: TCP
      port: 9630
      targetPort: 9630
  type: ClusterIP

## Add Service Scrape
---pg-service-scrape.yml
apiVersion: operator.victoriametrics.com/v1beta1
kind: VMServiceScrape
metadata:
  name: pg-exporter-scrape
  namespace: postgres
spec:
  selector:
    matchLabels:
      app: pg-exporter
  namespaceSelector:
    matchNames:
      - postgres
  endpoints:
    - port: metrics
      path: /metrics
      interval: 30s
      relabelConfigs:
        - source_labels: [__meta_kubernetes_namespace]
          regex: "postgres"
          target_label: tenant_id
          replacement: "10"
          action: replace
---
With these resources applied, our exporter is now up, running, and collecting a ton of great metrics.
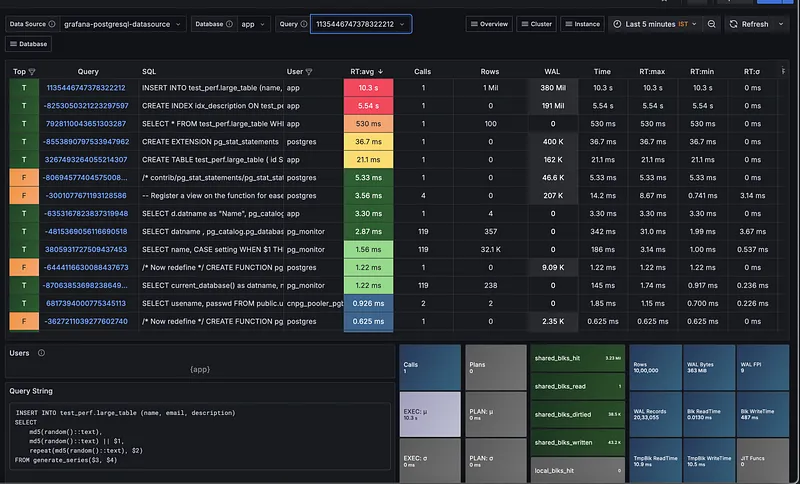
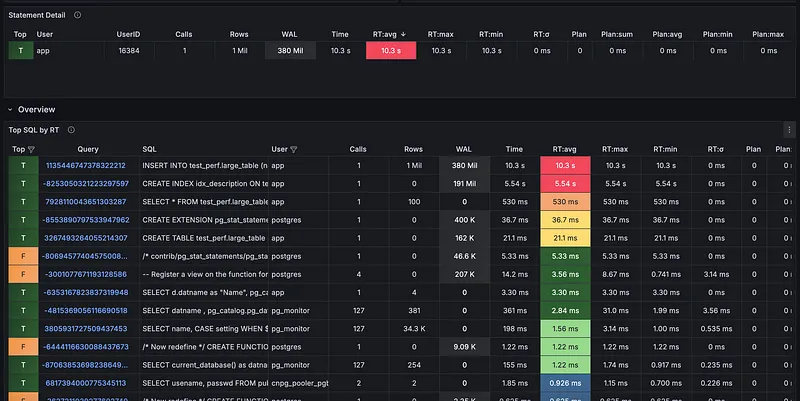
One of the biggest reasons to use the Pigsty exporter is the incredible library of pre-built Grafana dashboards that come with it. Instead of spending hours creating charts and panels from scratch, you get professional-grade dashboards right out of the box.
This is a huge time-saver and gives you deep insights from day one. You can find all the dashboard JSON files directly in the Pigsty GitHub repository, and you can even check them out live on their official demo site.
After importing a few of the key dashboards into my Grafana instance, here’s a sneak peek at the kind of visibility we get instantly.
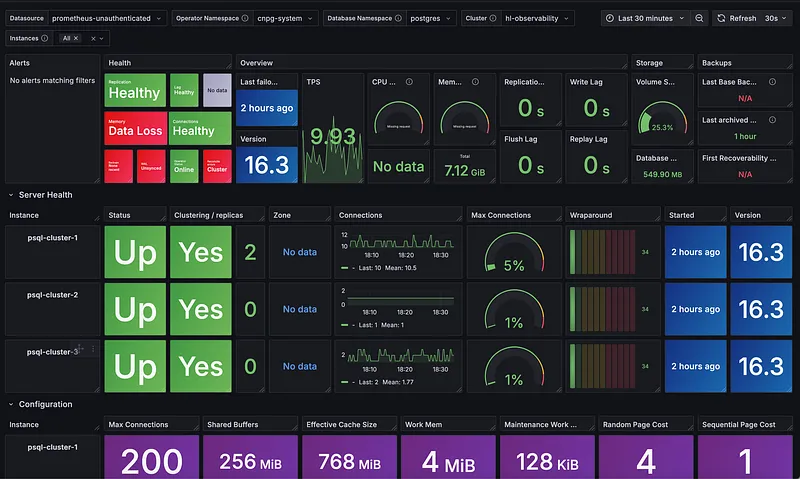
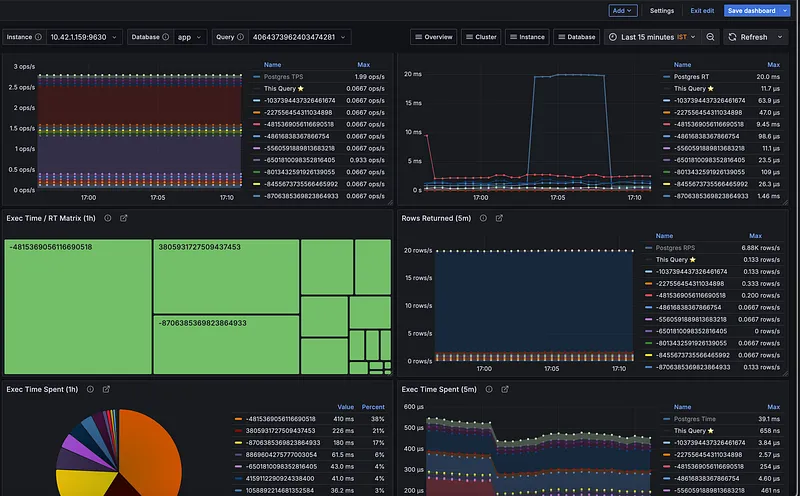
And there you have it! As you can see, the level of insight we get from combining these tools is incredible, and we’re really just scratching the surface. There is a lot more you can do with a stack like this, from fine-tuning performance to setting up advanced alerting.
Let’s wrap it up here for now. I’ll definitely be exploring more with these tools, and I’m excited to continue sharing what I learn about these cool open-source projects with the community.