
In the first part of this series, we brought our homelab server to life! We set up a NixOS management server to control everything centrally, used Disko to declaratively partition our main server’s disks, and bootstrapped the whole system, including our user setup, using a Nix Flake and Colmena.
Now for the fun part. We’re going to give our server a purpose. We’ll set up Traefik with Let’s Encrypt for reverse proxying and deploy Keycloak to act as our authentication gatekeeper. I want to show a couple of different deployment styles, so we’ll deploy Traefik and Keycloak as native Nix services, but then we’ll use Docker to run Komodo, a great GUI for managing containers.
To tie it all together, we’ll use Komodo to deploy a Dozzle stack and then use a Traefik OIDC plugin to secure it with Single Sign-On from our Keycloak instance. And, of course, we’ll manage all our secrets declaratively with sops-nix and age encryption.
Let’s get started!#
Step 1: Laying the Groundwork — Secrets Management with sops-nix#
Before we deploy any services, we need a secure way to handle secrets like API tokens and passwords. sops-nix is the perfect tool for this.
Generating Your Age Key
First, we need to generate an Age key that sops will use for encryption. We can cleverly derive one directly from your SSH private key so you don’t have to manage a bunch of different keys.
1.  Copy your SSH private key (e.g., id_ed25519) to your management server's ~/.ssh/ directory.

2.  On the management server, run these commands:

    # Create the sops age directory
    mkdir -p ~/.config/sops/age

    # Generate the age key from your SSH key
    nix-shell -p ssh-to-age --run "ssh-to-age -private-key -i ~/.ssh/your_ssh_private_key > ~/.config/sops/age/keys.txt"

    # View your private and public age keys
    cat ~/.config/sops/age/keys.txt #Private
    nix-shell -p age --run "age-keygen -y ~/.config/sops/age/keys.txt" #Public
Configuring SOPS
Now, create a .sops.yaml file in your servers/tools/ directory. This file tells sops which keys to use for encrypting files in a given path. Paste your public age key in here.
# servers/tools/.sops.yaml
keys:
  - &tools age1jghhfq9pjd6gzht3z8tc638hmpxuzu7w7avx4gmtheqwqczewe6qzvl4j2
creation_rules:
  - path_regex: 'secrets/.*\.(yaml|yml|pem|env|toml)$'
    key_groups:
      - age:
          - *tools
Step 2: The Gateway — Setting Up Traefik#
Let’s start with Traefik. It was one of the first projects I used when I began my homelab journey, and it’s been my favorite reverse proxy for years.
First, we’ll add a new file to our setup: servers/tools/traefik.nix.
You can see my full Traefik config on GitHub ⤴
Encrypting the Traefik Secret
Traefik will need an API token to solve DNS challenges with Cloudflare. Let’s create an environment file for it and encrypt it with sops.
1.  Create the plaintext secret file:

    # servers/tools/secrets/traefik-enc.env
    CLOUDFLARE_DNS_API_TOKEN=your_token_value_here

2.  Encrypt it using the .sops.yaml config we just made:

    nix-shell -p sops --run "sops --config ./servers/tools/.sops.yaml --encrypt --in-place ./servers/tools/secrets/traefik-enc.env"
Your traefik-enc.env file is now safely encrypted! It’s a great idea to set up pre-commit hooks to ensure you never accidentally commit an unencrypted secret to Git.
Integrating Traefik into the System
Now, we just need to tell our main configuration to use the new Traefik module and the secret we just created.
# servers/tools/default.nix
{ config, pkgs, ... }:

{
  imports = [
    ./networking.nix
    ./traefik.nix
  ];

  # This tells sops-nix how to handle our encrypted file
  sops.secrets."traefik.env" = {
    sopsFile = ./secrets/traefik-enc.env; # Note: Use the encrypted file path
    format = "dotenv";
    # sops-nix will place the decrypted file here for Traefik to use
    path = "/etc/secrets/traefik.env";
    owner = "traefik";
    group = "traefik";
    mode = "0400";
  };
}
Deploying with Colmena
To deploy our changes, we need password-less SSH access to our target server.
1.  Add an entry to your local ~/.ssh/config:

    Host hl-nixos
      HostName 10.0.5.114
      User hacstac
      IdentityFile ~/.ssh/your_ssh_private_key

2.  Now, deploy the changes from your management server:


    export SSH_CONFIG_FILE=~/.ssh/config
    nix shell github:zhaofengli/colmena

    # From your git repo directory
    colmena build --on hl-nixos
    colmena apply --on hl-nixos

That’s it! Traefik is now running on your server. Easy, right?
Step 3: The Gatekeeper — Deploying Keycloak#
Next up is Keycloak. For this, we’ll use a modular structure to show just how descriptive you can get with Nix. We’ll create a keycloak directory containing separate files for the database, the Keycloak service, and its Traefik routes.
Our new file structure inside servers/tools/ will look like this:
├── keycloak
│   ├── default.nix      # Main file to import others and define secrets
│   ├── keycloak.nix     # Keycloak service configuration
│   ├── postgres.nix     # PostgreSQL database configuration
│   └── traefik.nix      # Traefik router configuration
This keeps everything neatly organized.
For Keycloak’s secrets (the admin and DB passwords), we’ll use a YAML file instead of .env just to show how sops-nix can handle different formats. Simply create and encrypt servers/tools/secrets/secrets-enc.yaml with the required passwords.
To deploy, we just import the new keycloak directory into our main default.nix and run** colmena apply — on hl-nixos** again.
Step 4: The SSO Magic: Securing Apps with Traefik and Keycloak#
Now that we have Keycloak running, we can use it to secure our other applications.
There are many ways to achieve this, like using separate oauth2-proxy containers or other forward-auth tools. But for our setup, the simplest approach is to use a Traefik plugin that handles OIDC authentication directly. Since it’s built right into Traefik, it’s efficient and easy to manage.
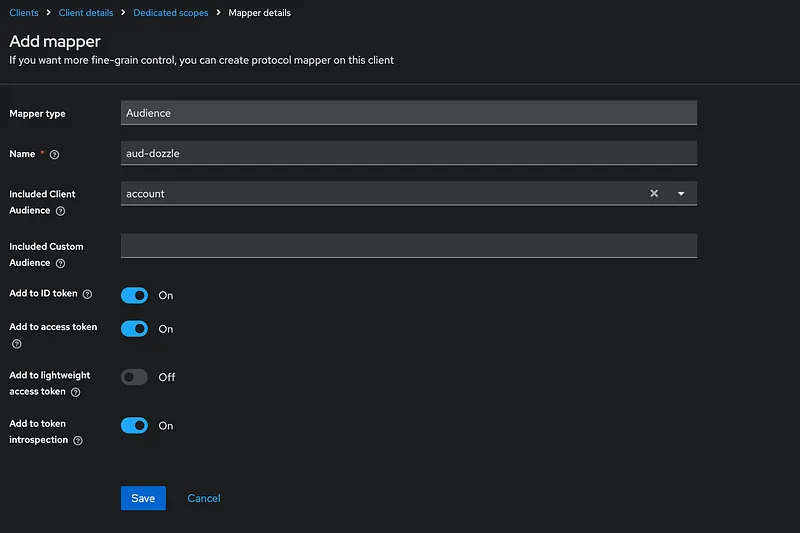
Now create a client and dedicated mapper for that client:
Step 4.1: Enable the OIDC Plugin in Traefik#
First, we need to tell Traefik to download and enable the plugin. We do this by adding the experimental block to our main servers/tools/traefik.nix file.
# servers/tools/traefik.nix
services.traefik.staticConfigOptions = {
  # ... ...
  experimental.plugins.traefik-oidc-auth = {
    moduleName = "github.com/sevensolutions/traefik-oidc-auth";
    version = "v0.13.0";
  };
};
Step 4.2: Configure Traefik’s File Provider#
The plugin is configured as a middleware in a separate file. We need to tell Traefik to watch a directory for these kinds of dynamic configuration files. Add this file provider to your traefik.nix as well.
# servers/tools/traefik.nix

services.traefik.staticConfigOptions.providers = {
  # ... ...
  file = {
    directory = "/etc/traefik/dynamic";
    watch = true;
  };
};
Step 4.3: Create the OIDC Middleware#
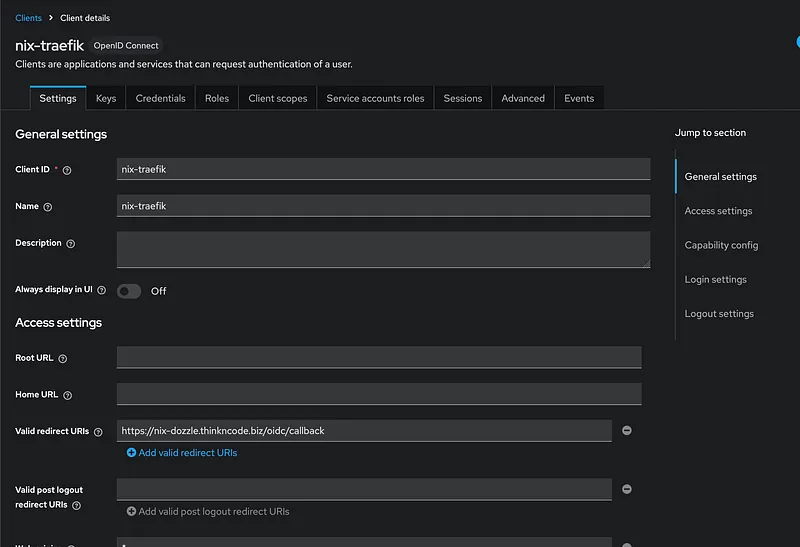
Now, we’ll create a new file, servers/tools/oidc-middleware.nix, to define the middleware itself. This Nix code will generate the final TOML file that Traefik reads, securely injecting our ClientSecret from sops.
# servers/tools/oidc-middleware.nix
{ config, pkgs, ... }:

{
  sops.secrets.oidc_client_secret = {
    sopsFile = ./secrets/secrets-enc.yaml;
    neededForUsers = false;
  };

  sops.templates."oidc-middleware.toml" = {
    content = ''
      [http.middlewares."oidc-auth".plugin."traefik-oidc-auth"]
      Scopes = [ "openid", "profile", "email" ]

      [http.middlewares."oidc-auth".plugin."traefik-oidc-auth".Provider]
      Url = "https://nix-keycloak.${config.networking.domain}/realms/master"
      ClientId = "nix-traefik"
      ClientSecret = "${config.sops.placeholder.oidc_client_secret}"
      UsePkce = true
      ValidAudience = "account"
    '';
    owner = "traefik";
    group = "traefik";
    mode = "0600";
  };

  environment.etc."traefik/dynamic/oidc-middleware.toml" = {
    source = config.sops.templates."oidc-middleware.toml".path;
    user = "traefik";
    group = "traefik";
  };
}
Step 4.4: Add the Secret and Deploy#
- Add the oidc_client_secret key and its value to your secrets-enc.yaml file and re-encrypt it.
- Import the new middleware file into your main servers/tools/default.nix:
- Deploy the changes!
# servers/tools/default.nix
imports = [
./networking.nix
./traefik.nix
./oidc-middleware.nix # <-- Add this line
./keycloak
];
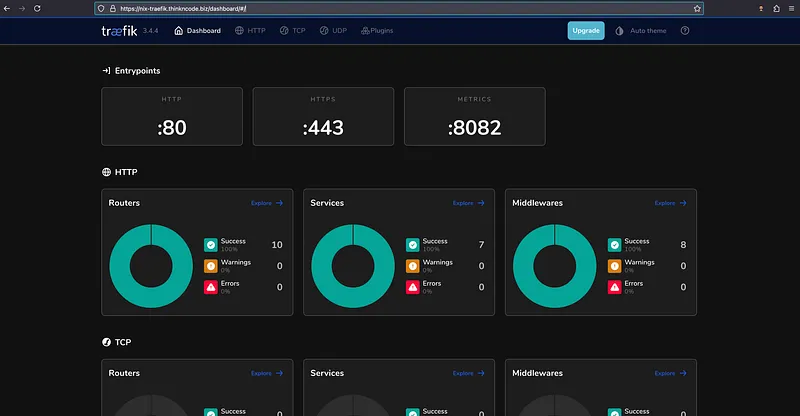
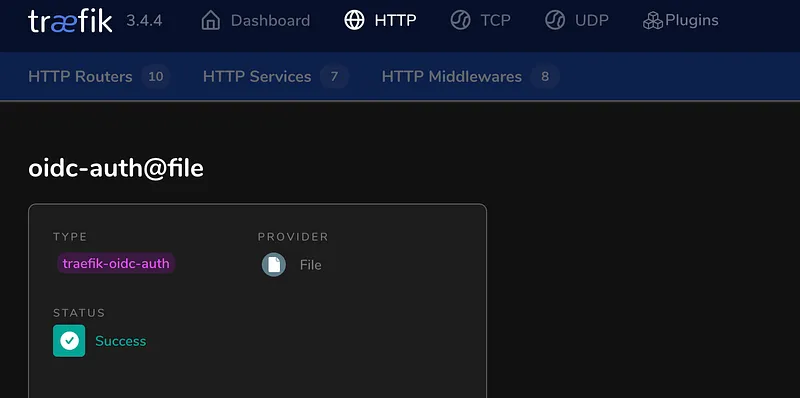
colmena apply --on hl-nixosNow, if you check your Traefik dashboard, you’ll see the new oidc-auth middleware ready to be used.
Step 5: The Fun Part — Komodo, Dozzle, and SSO#
Now it’s time to fire up some containers! For this, we’ll use Komodo, a sleek and powerful GUI for managing Docker. In Part 1, we already enabled Docker on our system with these lines in our configuration:
# servers/configuration.nix
virtualisation.docker.enable = true;
virtualisation.oci-containers.backend = "docker";
This is a great example of deploying a different type of workload. While Keycloak and Traefik are native NixOS services, Komodo will run as a classic Docker container stack, which we will still define declaratively in its own Nix file.
Our file structure will now include komodo.nix and its associated secret files:
└── tools
    ├── ...
    ├── komodo.nix
    ├── ...
    └── secrets
        ├── komodo-base.env       # Unencrypted env vars for Komodo
        ├── komodo-extended-enc.env   # Encrypted env vars for Komodo
        ├── ...
The process is the same as before:
- Add the configuration for Komodo’s containers to servers/tools/komodo.nix.
- Add the necessary sops.secrets entries for komodo-base.env and komodo-extended-enc.env to your servers/tools/default.nix.
- Deploy everything with Colmena:
The Payoff: Deploying Dozzle with SSO
With Komodo running, we get to the final and most satisfying step: deploying a new application and securing it with our Keycloak SSO in just a few clicks.
We’ll use Komodo to deploy Dozzle, a fantastic real-time log viewer for Docker containers.
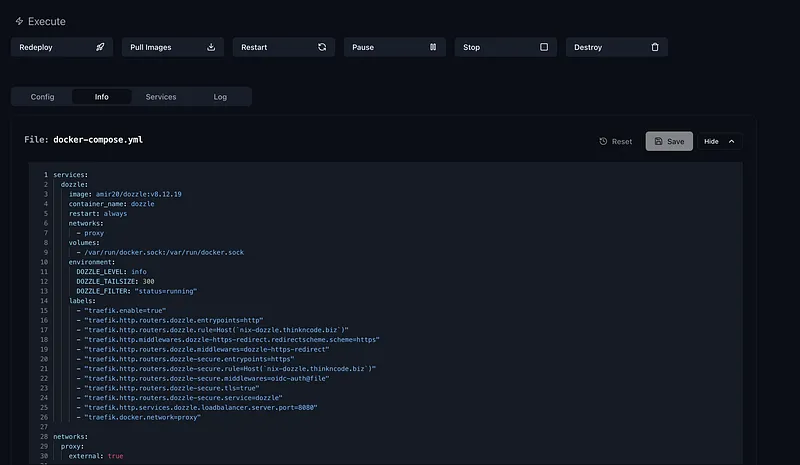
First, create a docker-compose.yml for Dozzle somewhere on your server that Komodo can access. In my setup, I’ve mounted /home/hacstac/homelab into the Komodo container for this purpose.
File: /home/hacstac/homelab/dozzle/docker-compose.yml
services:
  dozzle:
    image: amir20/dozzle:v8.12.19
    container_name: dozzle
    restart: always
    networks:
      - proxy
    ...
    labels:
      ...
      - "traefik.http.routers.dozzle-secure.rule=Host(`nix-dozzle.thinkncode.biz`)"
      - "traefik.http.routers.dozzle-secure.middlewares=oidc-auth@file" # Add a oidc middleware
      - "traefik.http.routers.dozzle-secure.tls=true"
      - "traefik.http.routers.dozzle-secure.service=dozzle"
      - "traefik.http.services.dozzle.loadbalancer.server.port=8080"
      - "traefik.docker.network=proxy"

networks:
  proxy:
    external: true
Now, let’s deploy it using the Komodo web UI:
- Log in to Komodo.
- Navigate to Stacks and click Add Stack.
- Give it a name (e.g., “dozzle”).
- Choose the “File on server” method.
- Set the path to your Compose file: /homelab/dozzle/
- Click Save, review the manifest, and hit Deploy.
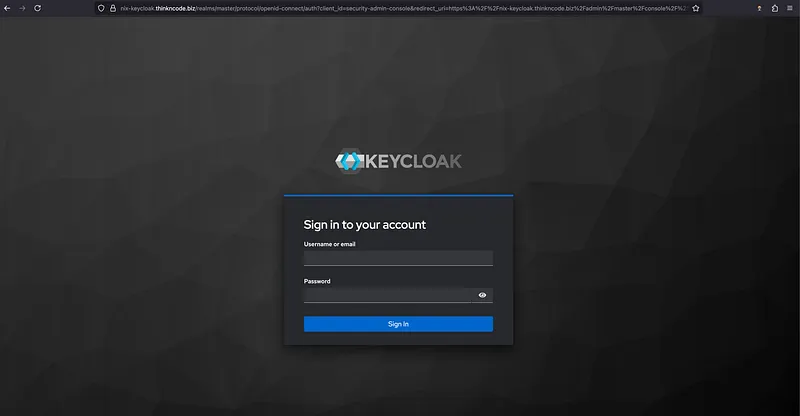
Now, try to access nix-dozzle.thinkncode.biz. You should be immediately redirected to your Keycloak login page.
Voila!! We’ve successfully built a declarative server, deployed a mix of native and containerized services, and secured an application with Single Sign-On.
You can check all the code here on GitHub ⤴
We have a lot more tools to add to this stack, so stay tuned for the next part!